Saturday, July 30, 2011

Date error when starting RTC report

Microsoft Dynamics NAV 2009 is in many ways depending on Microsoft Windows OS.
One of dependencies we're going to talk about is date formating.

NAV 2009 RTC has issue with interpretation of date formating and displaying reports if date format isn't set up according to RTC liking. In my experience when trying to run RTC reports with standard date formating You'll get following error::


Just for information (You probably won't get same error as I did) this error is displayed in Croatian language (from NAV 2009 R2 Croatian localization) and it means: Date isn't valid.

Solution for this problem is to set up Microsoft Windows Regional Settings and change date formating. Path to date formating set up is:


Control Panel > Regional Settings > Formats > Additional settings... > Date > Date formats.

Here you need to change two fields:
  • Short date,
  • Long date.


Yuo need to change current values to:
  • Short date: d.M.yyyy
  • Long date: dd.MMMM.YYYY
Notice that only thing that is different is full stop mark (".") at the end of date formatting.
After change (close RTC if you opened it) start NAV 2009 RTC.

Thursday, July 28, 2011

RTC Connection to SQL Server

Have you ever had problems with NAV upgrade and RTC connection?

Today we've just finished wih upgrade from NAV 4.0 SP4 to NAV 2006 R2 and had wierdes problem. After upgrade, testing classic client functionalities and RTC functionalities we decided that it's time to upload ugraded database to client server.

After setting up server, installing new clients and testing of classic functionalities we moved on to RTC testing. Of course we thought that we aren't going to experience any problems because of previous hard RTC tesing. And we were wrong.

We got our first error and eaven didn't start RTC on client side. Even we installed Demo database (Cronus International Ltd.) and showed it to he users and modified connection string to our database we  got this error:


And then we started mining for solution. This is what we tried:
  • deleting user personalization table (2000000071),
  • restarted NAV services,
  • restarted Windows server,
  • deleted and updated object medatada table (2000000071) from Cronus databas for common objects.

Last thing that we tried (and that did the trick) was deleting Object metadata table and compiling all objects from Object designer.

CodeGenius for RTC

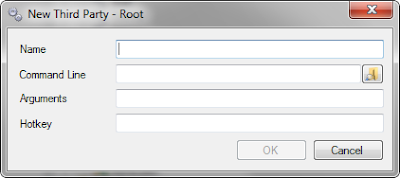
Open CodeGenius Studio (Configurations) and add a "Third Party" shortcut. You'll open this form:


In command line, select the exe of the RoleTailored client. Here's default location:

C:\Program Files\Microsoft Dynamics NAV\60\RoleTailored Client\Microsoft.Dynamics.Nav.Client.exe

In the "Arguments" section, you can use the DynamicsNAV://... type of notation. For example:

DynamicsNAV://LocalHost:7046/DynamicsNav/"CRONUS Hrvatska d.o.o."

Or, go a little bit further and include the Role that you want to start as well:

DynamicsNAV://LocalHost:7046/DynamicsNav/"CRONUS Hrvatska d.o.o." -profile:"ORDER PROCESSOR"

Or, if you want to take it a little bit further, you can include the configuration-mode option:

DynamicsNAV://LocalHost:7046/DynamicsNav/"CRONUS Hrvatska d.o.o." -profile:"ORDER PROCESSOR" -configure

Bottom line, with CodeGenius you can control all RTC's available options that can be used from command line.

Thursday, July 21, 2011

NAV 2009 feature: Substitute posting groups

New feature: Substitute posting groups.

Every functionality in Sales and Marketing, that has any relevance to Posting groups, has new functionality which backs-up original posting group setting.
This functionality enables users to set up substitute posting groups thus disabling users to change posting groups as they please. Substitute Posting Groups option needs a little more effort to set-up, you'll extend NAV's security features to new level.
Standard NAV 2009 feature copies Posting groups directly from customer or vendor cards directly in form field which is dedicated to Posting group (ex. Customer Posting Group). NAV 2009 requires user to set-up rights for changing posting groups, or to enable substitute posting groups.
Setup Path: Financial Management > Receivables > Setup > Sales and Receivables Setup.

This setup form has Boolean field Allow Alter Posting Groups which enables changing of posting groups.
After enabing change of Posting Groups fill in substitute posting groups. This is done in Posting Groups SubForm

Customers Vendors
Form ID: 110 Form ID: 111
SubForm ID: 26504 SubForm ID: 26505

Path for customers: Financial management > Setup > Posting Groups > Customer > Posting Group > Substitutions.


Path for vendors: Financial management > Setup > Posting Groups > Vendor > Posting Group > Substitutions


Here are some pointer for consultants and implementators:
  1. When entering posting groups through NAV forms you'll get error when trying to enter same substitute posting group as upper (normal) posting group.
  2. When trying to choose posting group from Posting group flow field, and you choose same posting group you'll get error:

Tuesday, July 19, 2011

RTC vs Classic MenuSuite

In the Classic client, accessing forms and reports is done from the navigation pane, which displays menus that are contained in a MenuSuite object. In the RTC client, navigation to pages and reports is done with:
  • Role Centers
  • Departments
MenuSuite object that is useed in the Classic client can be transofmed to a Departments page that is used in the RoleTailored client.
The Departments page contains entire suite of functionality available to the company. In this way, the Departments page in the RTC is similar to the navigation pane in the Classic client. The Departments page is also a MenuSuite object with layered item structure but is designed specifically for RTC.
When creating a new MenuSuite object, you must select either the Classic client or the RoleTailored client as the target.

The ID of a MenuSuite object for the RTC will be the Classic client ID plus 1000, as shown in the following table.

MenuSuite object in the Classic client MenuSuite object in the RoleTailored client
10 MBS 1010 Dept - MBS
51 Add-on 1 1051 Dept - Add-on 1

MenuSuite object is transformed by using the Transformation Input File (TIF) Editor. The MenuSuite transformation creates a suggestion for a Departments page that is based on the navigation pane, transformation rules, and input.
After MenuSuite object transform ation, you must verify whether you need to make additional updates to the transformed Departments page. The RoleTailored client has different functionality and different user experience (UX) requirements than the navigation pane in the Classic client. The additional updates that you make to the transformed Departments page can take advantage of the new functionality.
To reduce the number of these manual updates that you have to make after transformation, verify that you meet the following conditions before transforming a MenuSuite object.

Condition Reason
PageType is assigned to all form objects. Form objects will be placed in a Department Category based on PageType.
CardFormID is assigned to all list form objects with a card. Card Form IDs in MenuSuite will be replaced with the related list.
Microsoft Dynamics NAV Developer Toolkit is installed to provide data about which reports are ProcessingOnly reports. ProcessingOnly reports are placed in the Tasks category on department pages. Other reports are placed in the Reports and Analysis category on department pages.

Wednesday, July 13, 2011

Running Transformation Tool

To run transformation tool witf TIF 1.21.700 editor and convert form to page follow there steps:
  1. Navigate to Transformation tool: Transformation > Transform forms 
  2. Start funkction: Setup > Get Forms to add forms to transformation tool.
  3. Enter ID of form you would like to transform (best view from object designer)
  4. PageType: choose Card or List or whatever option of form best suites your conversion
  5. Function > Create transformation input > Transform pages. This creates TransformPages.xml which is exported form from transformation tool.
  6. Export form from Object designer in XML form and name it Forms (forms.xml).
  7. Run Form transform tool by double clicking on Microsoft.Dynamics.Nav.Tools.FormTransformation.exe which must be located in folder entered on Setup > Transformation card setup.
  8. Open object designer and import created Pages.XML.
  9. Compile imported object in Object Designer.
  10. Edit menu (RTC menu usually named with „Dept –„) and add created page to menusuite.

Transformation Tool MenuSuite

When importing Transformation tool it creates seperate MenuSuite "TIFPM Transformation" with ID 52 and updates Company menusuite with new menu item "Transformation".

Problem with this menusuite is that users cann't see it in their normal view because menusuite created in Company menusuite has no itmes, just tree structure.

Sollution to this problem is to open two clients and copy/paste Transformation menuitems from "TIFPM Transformation" menusuite from one client to Company menusuite in other client. This copy/paste operation is done in design function of menusuite.

After copy / paste is completed you can simply delete TIFPM Transformation menusuite because all items are in Company menusuite.

Be advised to close and compile LAST one menusuite that you did paste operation.